Taking a Better Measure for the Tent Trailer Tent
One of the things I’m determined to do on this build is to make it easier to make the tent trailer tent, and to get a better result. (Okay, that’s two things.) On previous builds, I started taking good measurements then kind of went from measuring to the quarter inch, to the half, then to the inch, then…ah hell, I’ll make it fit. Sometimes that’s fine like in areas where you know you’ll be trimming something to length. In other areas, like where the tent fits over the support bows, the results were sometimes a little baggy.
Another issue was getting consistency across the panels in things like window placement. On one side, the rear window would be slightly higher than the front window. On the other side, it would be just the opposite. The rain skirt would attach 1” from the window in one area and 1.5” in another.
For the last tent I made, I inadvertently turned my template 90 degrees and cut one piece of fabric with the bias instead of against the bias—or maybe it’s the other way around, IDK—but the result was that one of the side panels stretched as I sewed it to the roof so when I got to the end, it was an inch longer than the roof. THAT was an error I would attribute to simple inexperience.
So with all of that in mind, I set out to improve this tent by spending more time up front with measuring and pattern making. Assuming this design turns out well and I build more on it, the time I’ve invested now will pay off later.
Simpler dimensions
I started by simplifying the dimensions of the trailer tent by spending more time tweaking the frame dimensions. In previous builds, the frame dimensions were not squared up, which led to a lot of panels with slight differences in measurements from front to back. For example, the roofline at the front tent bow was 78” and at the mid bow it was 80”. That created a 2” taper in the tent sides from front to rear. This lack of square also meant that there were definitive right and left side pieces to track.

In this build, I spent a lot of time adjusting the frame to eliminate those differences so that the panels would be a consistent height and width. This will make sewing easier and it will eliminate the chance that I might sew the right panel to the left side or vice versa. I eliminated the taper in the rear window and a taper in the entry door. Everything is square. Now, the only side-dependent pieces I have to track are the left and right rear side panels with the long sloping roofline.
Better measures, and more of them
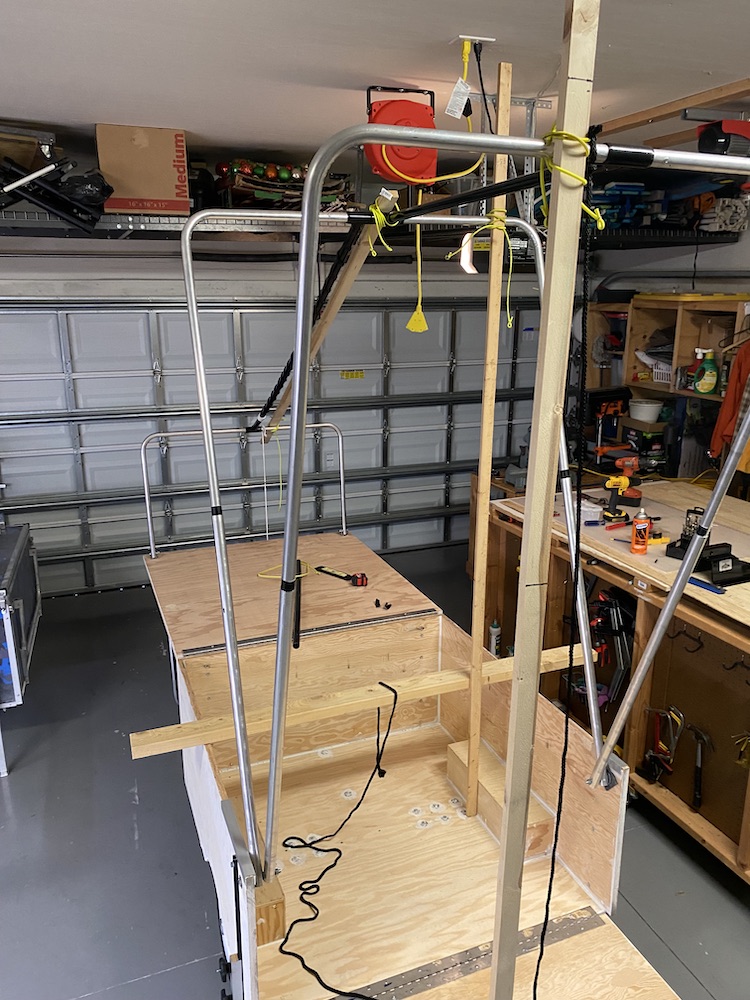
Actually, I started simplifying the dimensions by taking better measurements. It’s a challenge to get good measurements on a framework that uses the tent to hold it up when the tent hasn’t yet been made and attached.

As a substitute, I used 8 foot lengths of 1×2 strips to hold the bows up. These strips also performed another important function. They helped me insure that the bows were positioned exactly where I wanted them over the body. In the front, I wanted the front bow to align with the inside edge of the trim that holds the front door in place. This means the front door would be squared up, so the material I cut would be square.
I fastened a 1×2 to the front edge of the bow, then positioned wood strip at the bottom where I wanted the tent to attach. I then moved the bow to reposition the wood strip and to make it vertical. Once my level showed me the wood strip was vertical, that mean the bow was placed exactly in the spot I wanted for the trailer tent material to attach at the bottom.
On top, I could use the level to get the front and middle bows at exactly the same height, which would square up the front side panels. I could also get a much more accurate measurement of the exact point where the front and rear side panels would meet on the camper body.
I did a lot of adjusting to the the length of the support poles that tie the bows together and I made small adjustments to the extended height of the bows. After making a lot of measures and notes, I came back the next day and remeasured. I found a couple of measurements I missed the first time around and confirmed everything else.
Better templates
My templates have been steadily improving since I made the first ones from paper. I graduated to cardboard for the second set, then set out to create some really nice ones from corrugated plastic sheets. I made a complete set of those for the K3 design.

Of course, this design is different. The overall setup is a few inches longer and a couple inches narrower. The heights are slightly different, and all of the panels are squared up. The means that every template I made would need to be either modified, or remade. I chose to try to modify them.
This turned out not to be as much work as I thought. In many cases, I was trimming away some material from the template being modified, so that actually was a pretty quick process. The only panel that required substantial refitting was the rear side panel. This section gained length, which also changed the slope of the roof. (The roof also went from 113” to 122” but because it is square, I can easily extend my markings for the extra length on the roof material without the need for a pattern.)

While I was at it, I lined up the front and rear side templates and marked them both for window and rain skirt placement. This should help insure (in theory) that when I sew these panels together, the bottom line of the windows will match and I’ll have a consistent line for running the rain skirt along the entire length.
As I explain all of this it sounds kind of involved and complicated, but it wasn’t. It was just something that I had to be willing to take the time to figure out. But the result should be a much better tent trailer tent. I’m about to find out!
Questions?
For more information about this camper you can contact me through this page.
My business is selling motorcycle campers and trailers and the gear you need to tow them with a motorcycle or trike. I run two sites: Open Road Outfitters and US Hitch.