Last steps of the K4 Camper Build
After a burst of activity last week, I’m reaching the last steps of the K4 camper build. My first log entry was just seven weeks ago on May 11th. It seems like I’ve been working on it a lot longer than that. If I’d worked on it uninterrupted, I probably could’ve finished it in half that time. Not that it matters. This time of the year, it’s too hot camp in south Florida, so there’s no real rush. I’m down to the last bits with this one. I just need to add some final trim around the edges and finish off the carpet and trim inside.

Nearing the finish of the K4 camper. Carpeting is the last major step prior to fitting the tent 
After checking the bed fitment, I reinstall the tent bows. 
I use leftover pieces of 1″ channel to fit the tent to the camper body 
There are a few places where the tent fold changes direction, so that has to be trimmed and fitted. 
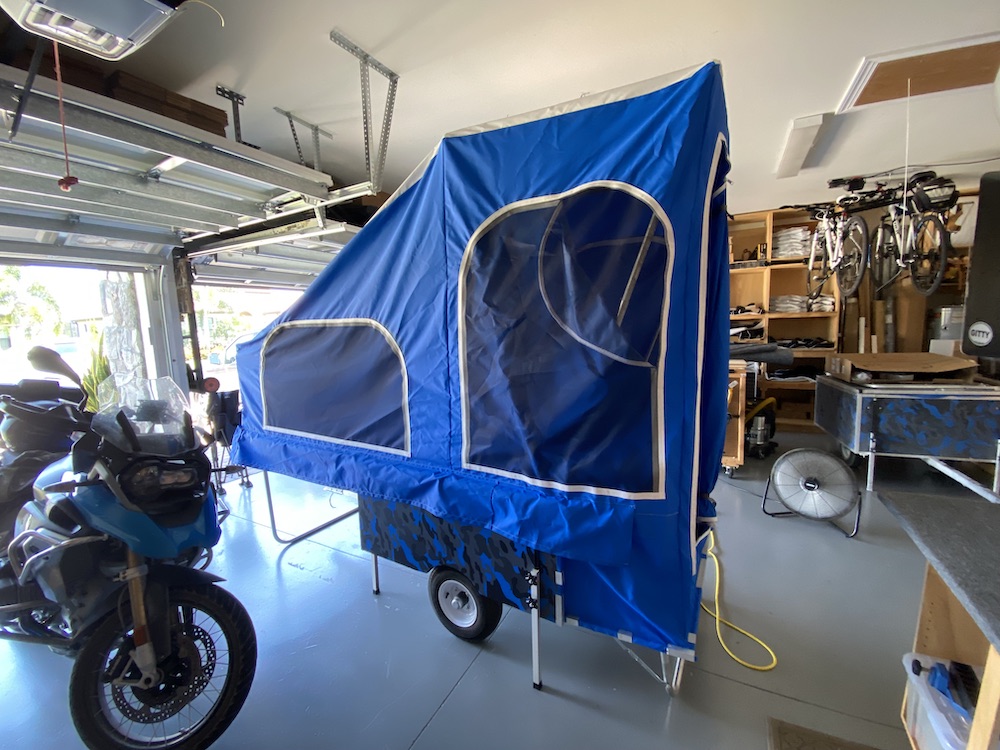
I enlarged the windows all around. I also used a finer “no seeum” screen on this build. 
Tent installed, now I’m checking to make sure everything fits in the box. 
I found adjustable camper latches. These are a little overbuilt for this application but not a deal breaker. 
There’s plenty of room in the new layout and no wheel well in the middle of the floor.
When I build these, the general sequence is:
- Cut all wood components that will be used throughout the build
- Assemble the cargo box/camper shell
- Install the suspension and tongue
- Make and install the leveling legs
- Make and install support bows for the partitions that open, and for the tent
- Measure/make the tent
- Apply vinyl wrap to box and lid
- Install lights
- Install carpet
- Install tent
- Make and install trim
- Add gasket, latches
That’s not an exhaustive list; there are other small things, but I think those are the major steps.
I really like the new layout. Having the wheel wells to the sides creates a lot of open room and it’s a comfortable space for sitting inside. Another positive is that the tent turned out really nice. It fits well and I didn’t make any major mistakes. I maximized the window size on this pattern and I like how those turned out.
Early on, I made a mistake on this camper, which usually means I’ll have issues to deal with throughout the build. I miscalculated the camper shell cuts by 1″, resulting in a box that was 47″ long instead of 48″. I’ve no idea how I did this.
I didn’t think much about it until I finished and installed the tent. My mind was already drifting to the next build when I realized that all the tent patterns I’ve made will be 2″ too short. A 1″ difference when the camper is closed becomes 2″ when the camper is open. So now I’m thinking “Crap, I’ll have to remake my all my tent patterns when I correct this mistake in the next build.”
I changed my mind about this after I started cutting and applying the trim. I use U-channel trim that I bought in two pre-finished lengths, 48″ and 60″. I bought the 60″ lengths for those parts of the camper that were right at 48″ because, after adding cuts to a 48″ length of aluminum, the finished piece would be just a little short.
Well, as it turns out, 48″ trim works really well on a 47″ body length. You only need to make small cuts to get the trim piece cut to the proper length and there is very little waste. Plus, 48″ lengths are less expensive than 60″ lengths. So I think I’ll stick with these dimensions on future builds. I won’t need to remake my patterns and I can use less expensive materials.
I had some minor concern about how the rear panel would turn out since it has the signal lights mounted to the outside. This panel now has a hinge and it drops down 90 degrees. That means that the wiring harness needs to be able to flex. Now that I’ve done it and wired it up, there’s actually not a lot of movement in that harness, so I don’t think it will be a big issue.
Time to wrap this on up so I can start thinking about the next!
Questions?
For more information about this camper you can contact me through this page.
My business is selling motorcycle campers and trailers and the gear you need to tow them with a motorcycle or trike. I run two sites: Open Road Outfitters and US Hitch.